Installing A Zipper In A Pillow Cover. Whether you're sewing it into the end of a box cushion or the back of a pillow, the process is pretty much the same. Just stitch one straight line up close to the zipper teeth. Here's an example of how your zipper will lie when you start gluing it in place (yes glue!). Adding a zipper to your pillows makes it e. Align the top edge of the zipper tape with the edge of the pillow top (folded down once by 1).
Learn how to make a pillow cover with a zipper in this easy tutorial for beginners. Add a zipper to a pillow cover. It's easier than you think! (this orange patterned fabric is the inside of my cover.) lay your zipper in the middle at the bottom of your cover, and make pencil marks at each stop on each end of the zipper. Remember to backstitch at the beginning and the end.
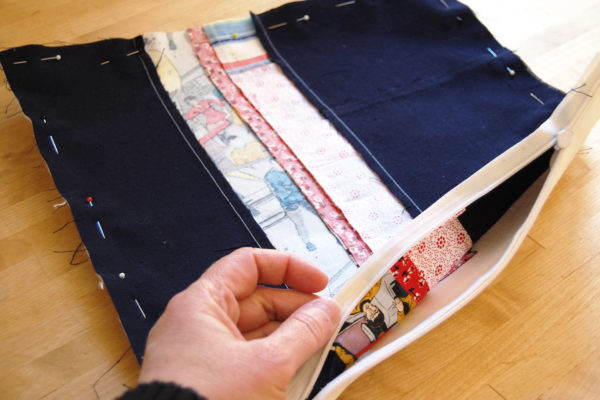
s.o.t.a.k handmade | Pillow covers tutorial, Pillow covers, Pillow covers easy from i.pinimg.com You can see my folded pressed crease in the photo. Now flip back the sewn side. Make sure the zipper coil faces towards the inside of the pillow and the edge of the zipper tape is flush with the raw edge of the pillow cover. It's easier than you think! Now line up the other side of the zipper to the right side of the second fabric piece and repeat on the this side. Place the remaining rectangle right sides together with the zipper section. Match raw edge of the rectangle with the unsewn edge of the zipper. Fortunately, it's really not as hard as it seems to sew a zipper in a cushion cover.
Whether it's to wash the cover or just to easily change out the decor, cushion covers with zippers are where it's at if you ask me.
Just stitch one straight line up close to the zipper teeth. If it's too close, the zipper won't work, so i typically aim for about 1/8″. (be sure to situate both pieces so that the print pattern is facing in the same direction.) Then i brought it to my sewing machine, and sewed along the zipper teeth. Whether it's to wash the cover or just to easily change out the decor, cushion covers with zippers are where it's at if you ask me. (this orange patterned fabric is the inside of my cover.) lay your zipper in the middle at the bottom of your cover, and make pencil marks at each stop on each end of the zipper. Installing zipper closure in a pillow cover {tutorial} it took a little longer than i thought, but i'm happy to say that i finally finished a tutorial showing you how i do zipper closures for my throw pillows. You can see my folded pressed crease in the photo. Align the top edge of the zipper tape with the edge of the pillow top (folded down once by 1). This will secure the zipper to the pillow and also serve as a top stitch, so you'll want the stitch to be pretty tidy. If you use thin fabric, ironing the fabric can make this part easier. Attach the zipper using the zipper foot on your machine. With a longer zipper the zipper pull will be outside of my working area, this way i will avoid difficulty working around the zipper pull.
Adding a zipper to your pillows makes it e. Whether it's to wash the cover or just to easily change out the decor, cushion covers with zippers are where it's at if you ask me. Just stitch one straight line up close to the zipper teeth. In this instructable, i'll show you my favorite way to make a zipper pillow cover. Some people like sewing the zipper first, i do it both ways.
How to Sew a Zipper on a Pillow Cover - The Willow Market from i2.wp.com Add a zipper to a pillow cover. Just before reaching the zipper pull, lift the presser foot and move the pull past the foot. Invisible zippers, zippers along the back, zipper flaps, etc. Especially ones that are much fancier. Using a zipper that was longer than the pillow width, i placed the zipper on the top piece with the zipper facing down and the right side of fabric facing up. Now flip back the sewn side. Clip the end of the zipper off. Align the top edge of the zipper tape with the edge of the pillow top (folded down once by 1).
This post contains affiliate links for your convenience.
With a longer zipper the zipper pull will be outside of my working area, this way i will avoid difficulty working around the zipper pull. Now line up the other side of the zipper to the right side of the second fabric piece and repeat on the this side. Some sewers simply cut off the zipper about 2″ from where the zipper comes through the end of the pillow (at that 2″ mark). 100% block dust, bed bugs & stains. Last step will be to cut off the excess zipper. Remember to backstitch at the beginning and the end. Whether it's to wash the cover or just to easily change out the decor, cushion covers with zippers are where it's at if you ask me. Fortunately, it's really not as hard as it seems to sew a zipper in a cushion cover. It's easier than you think! Line up the center pin on the cover with the center pin on the zipper (this will ensure your zipper is centered on the pillow's edge), and then line up the coils with your ironed crease line. Attaching a zipper isn't very difficult, as long as you have a zipper foot for your sewing machine. Use a zipper foot to sew along right side of zipper. Next, zip the zipper closed, leaving about four inches unzipped.
Align the top edge of the zipper tape with the edge of the pillow top (folded down once by 1). Adding a zipper to your pillows makes it e. The zipper pull is face down when you mark it (more detailed picture next). Fortunately, it's really not as hard as it seems to sew a zipper in a cushion cover. The 'stop' is the part of the zipper that stops the slide from going up or down any more.
Invisible Zipper Pillow Cover Tutorial | WeAllSew from weallsew.com Add a zipper to a pillow cover. Zippered pillow covers are super convenient to switch out, and they're not too tricky to make! And then, practice that new skill and whip up a quick little zippered pillow cover. (this orange patterned fabric is the inside of my cover.) lay your zipper in the middle at the bottom of your cover, and make pencil marks at each stop on each end of the zipper. Match raw edge of the rectangle with the unsewn edge of the zipper. Here's an example of how your zipper will lie when you start gluing it in place (yes glue!). Pillow covers are one of the fastest ways to freshen up a room. You can see my folded pressed crease in the photo.
Move the zipper foot to the other side and stitch right up against the teeth of the zipper.
Make sure the zipper coil faces towards the inside of the pillow and the edge of the zipper tape is flush with the raw edge of the pillow cover. Pin the zipper in place all the way down the length of the zipper, ensuring the coils stay along that crease line. Installing zipper closure in a pillow cover {tutorial} it took a little longer than i thought, but i'm happy to say that i finally finished a tutorial showing you how i do zipper closures for my throw pillows. Turn pillow and repeat along the other side of the zipper. Some people like sewing the zipper first, i do it both ways. Move the pull as needed. With zipper open, place one edge right side down on the bottom edge of one side of the pillow cover. Last step will be to cut off the excess zipper. Turn your pillow cover face down. Move the zipper foot to the other side and stitch right up against the teeth of the zipper. Please note which side of the zipper is along the fabric and where the free side of the zipper is in the photo. Next, zip the zipper closed, leaving about four inches unzipped. (which is great for taking on/off for cleaning, etc.) and really, there are several ways to make a zippered pillow cover.
Share :
Post a Comment
for "Installing A Zipper In A Pillow Cover"


Post a Comment for "Installing A Zipper In A Pillow Cover"